The upgrade to WordPress 3.0 seems to have worked! 🙂
Scripting fun: Rename files by date in Windows
When I’m working on a computer, I frequently make backups of what I’m doing. There are a lot of ways to do this, but the one I use is a bit ghetto.
1. Right click the folder with my work in it, and select “Send To > Compressed (zipped) folder”
2. Rename the resulting zip file so that the name includes the date in ISO format. You have to rename it in order to store multiple versions in the same place, so might as well add some useful data to the name.
3. Copy it to a backup drive somewhere.
I got fed up of doing the renaming manually, so I created (cobbled together from various Howtos) a batch file to do it for me. Here’s the code:
@echo off

FOR %%V IN (%1) DO FOR /F "tokens=1-6 delims=/: " %%J IN ("%%~tV") DO IF EXIST %%~nV-%%L%%K%%J-%%M%%N%%O%%~xV (ECHO Cannot rename %%V) ELSE (Rename %%V %%~nV-%%L%%K%%J-%%M%%N%%O%%~xV)
Paste that all into a text file (one long line!) and call it something like RenameByDate.bat.
Now, if you drag and drop another file onto this batch file’s icon, it should get renamed to its original name, plus the date and time of its timestamp.
If this doesn’t work, you may need to enter the following three commands at a command prompt, to enable drag and drop for batch files.
ftype batfile="%1" %*

assoc .bat=batfile

regsvr32 /i shell32.dll
(from here)
Finally, place the batch file in your Send To folder. (C:\Documents and Settings\YourUserName\SendTo)
Now you can rename any file, adding the date and time to the name, by right-clicking it and selecting “Send To > RenameByDate.bat”.
In other news, I’ve mostly been automating Bill Of Material generation with Perl.
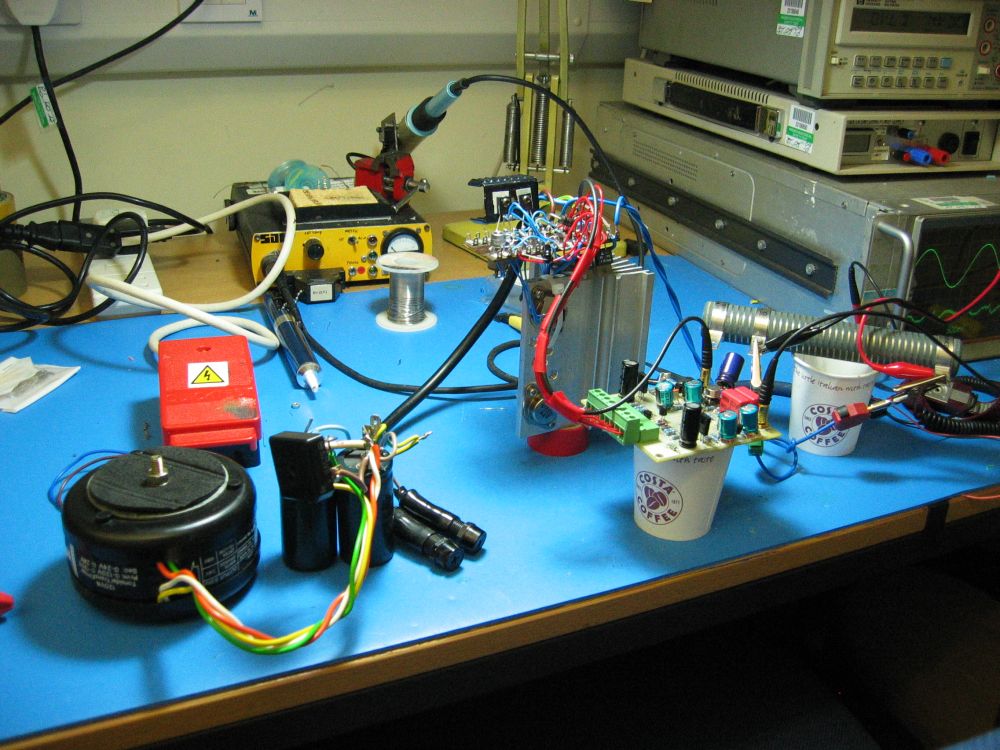
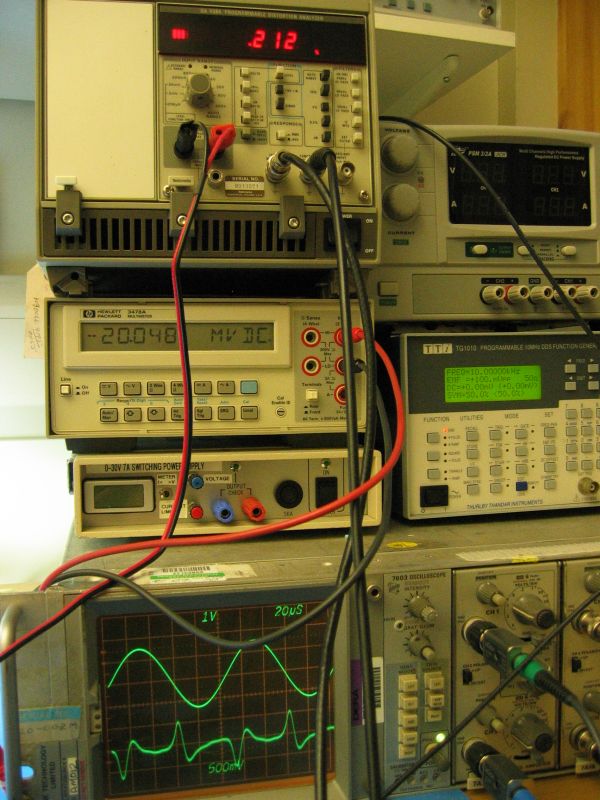
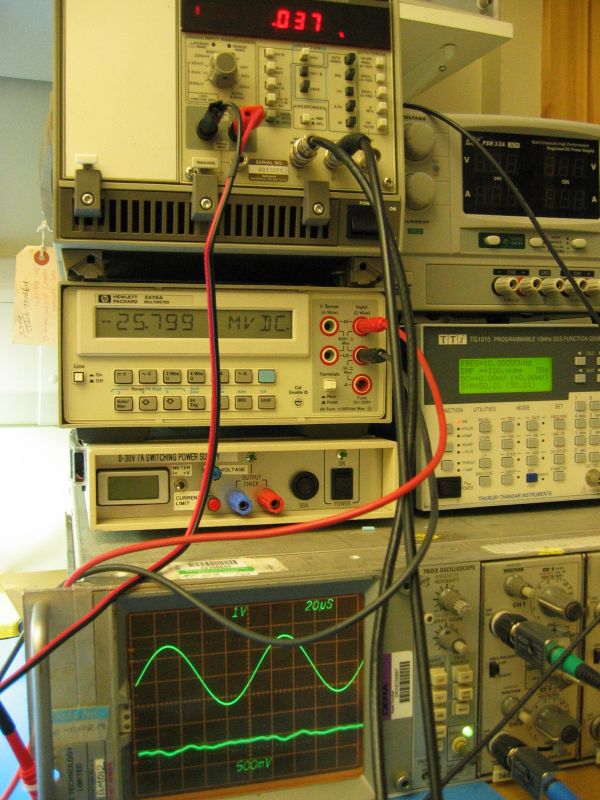
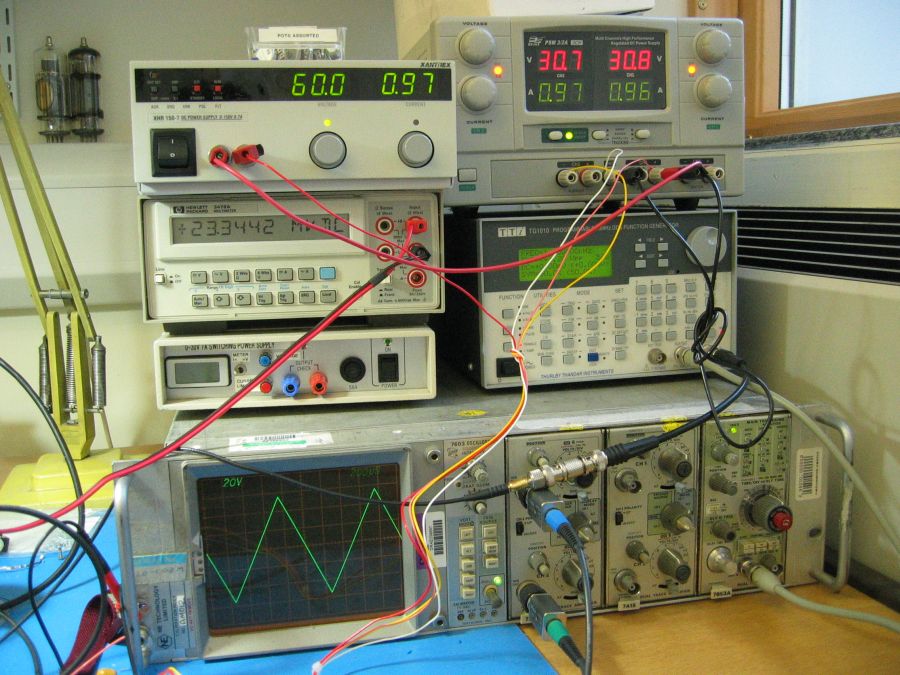
First THD analyser results!
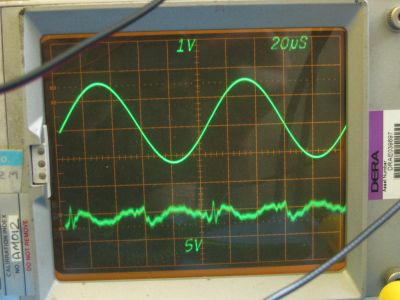
I’ve finally got the THD analyser hooked up and working! Not very well, though, because I have to use it with my not-too-hi-fi signal generator, on account of the analyser’s own oscillator section being AWOL. My sig gen is DDS-based, so it puts out lots of high-frequency crud and DAC quantization errors, and these overwhelm the amp’s own contribution to the residual. Except if I test at 10kHz and press the analyser’s low-pass filter button, which kind of fixes it…
Anyway, I hooked the Blameless up to an unregulated power supply to pump in plenty of hum and grunge (got to test that ripple rejection too!) and made some THD + Noise measurements.
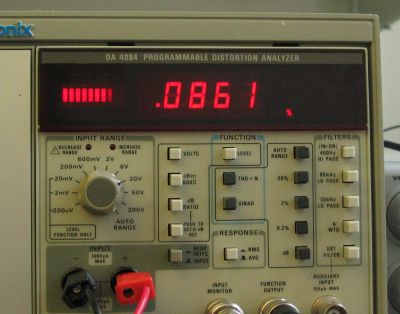
10kHz, 50W into 4 ohms: 0.086%
10kHz, 2W into 4 ohms: 0.037%
(I measured at 10kHz to try and force the amp to generate more noticeable THD levels. And yes I have the hi-pass button pressed: some hum is getting in somewhere…)
I also tried setting the bias pot to minimise THD. At 50W, this happened at a setting so cold that there was barely any bias at all! I measured a Vq of around 300uV. But at 2W, the minimum occurred at a Vq (across each emitter resistor) of about 14mV.
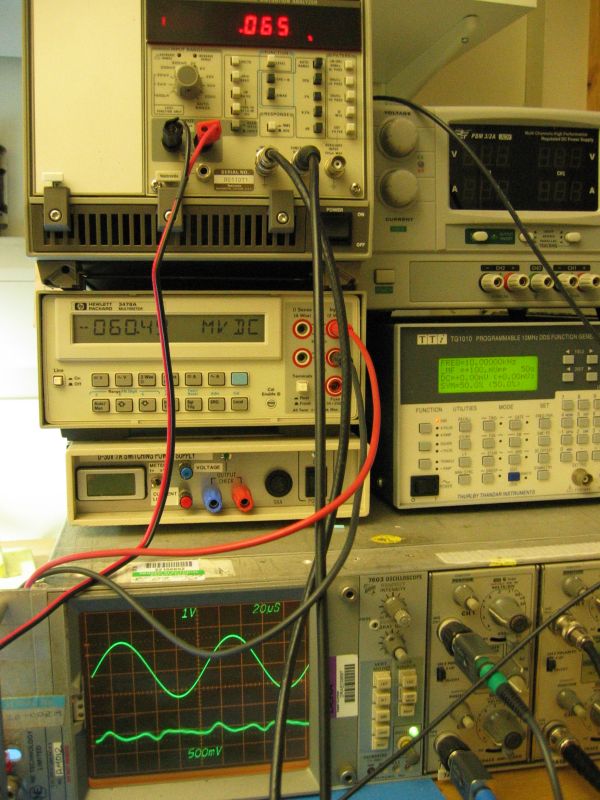
I think what’s happening is that at high power and high frequency, an overly cold bias helps to counteract the transistors’ slow turnoff. Too cold bias effectively starts turning them off in advance. This gives a false THD null. 2W seems to be a better power level for setting it.
At both power levels the THD nulls were very broad, and seemed to stay stable when I let the heatsink get burning hot, and then applied a fan to cool it back down.
Still a long way to go in terms of refining the THD measuring setup… but it’s a start!
Blameless short circuit protection
So, now the short-circuit protection is tested.
I used a dual-slope VI limiter as described by Self in his book, except I simulated it in LTSpice and played with the component values to lower the power dissipation a little. Self’s original design allowed the transistors to dissipate nearly their full rated 250W, and I thought that was excessive, since it’s only possible at a case temperature of 25’C, and that will never happen in practice.
I guess his reasoning is that since the amp will only amplify AC signals, then under short-circuit conditions each transistor will conduct with a duty cycle of 50%, so the mean dissipation will only be 125W. But I can imagine situations where that wouldn’t work.I also plan to try the NJL4281/NJL4302 transistors in the future, and these have less SOA than the MJ15024/MJ15025, the devices that Self designed the circuit for.
My new values were supposed to make the circuit limit at about 125W. Anyway, so I made the circuit up and tested it with the method described on Rod Elliot’s site. Namely, I shorted the amp’s output with a 0.1 ohm resistor, and fed 100us pulses at a repetition rate of 10Hz to the input. I did this with the amp running off two regulated supplies, allowing me to vary the rail voltage and note the current for each voltage.
At first, the negative rail had no limiting at all! It started out at 12A and headed skyward from there. It turned out that I put a diode in backwards, and also the gain of the PNP limiter transistor was low, and the VAS current limit was a little high. Once I got that fixed, I plotted out the two sets of results in Excel, and added loadlines for reactive and resistive loads on 40V rails.
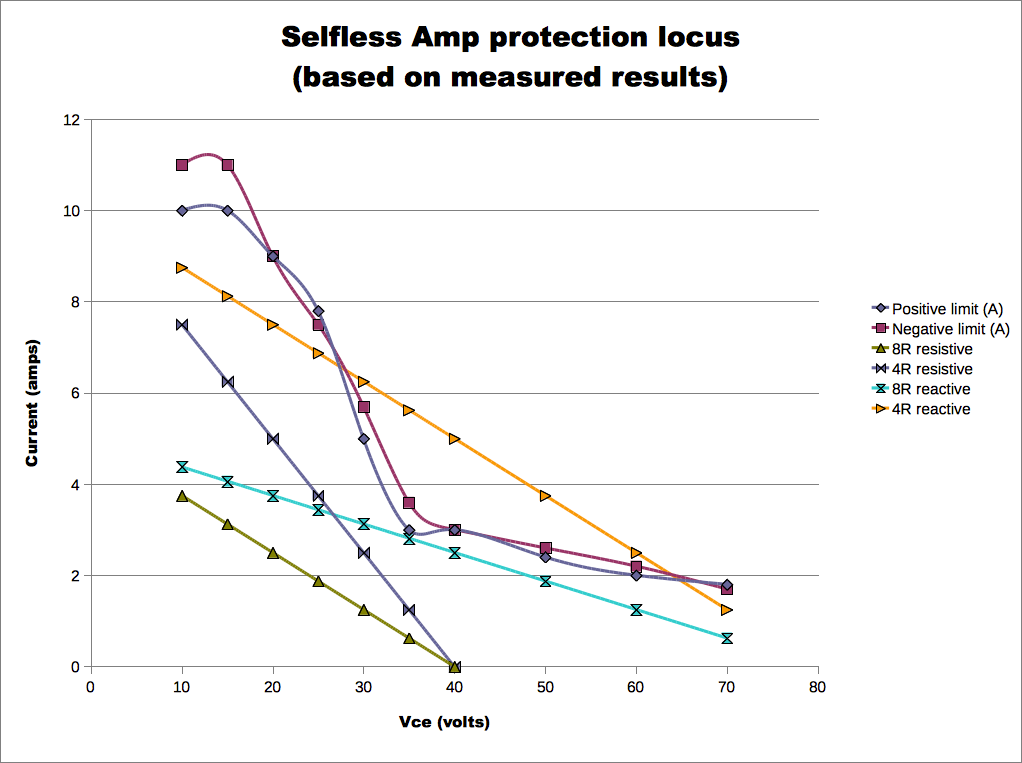
So you can see that with one pair of output transistors installed, we can just barely drive a 4 ohm resistive load or an 8 ohm reactive one. To drive a 4 ohm reactive load, we’d need two pairs, which is what I was expecting, and two pairs is what I plan to fit.
Finally as a sanity check I rigged up a reactive load: A big iron cored choke wound with about 80 turns of heavy wire. I put two 4.7 ohm resistors in series with it, and it could drive that easily at any frequency. Go down to one 4.7 ohm resistor, and I found a frequency where the limiter would activate and cause crazy clipping, like in Rod Elliot’s Figure 4 linked above. Again this agrees with what I expected, so we’re good to continue!
Note that before trying this test, I added the catch diodes from the speaker output back to the rails. Otherwise the output devices would be destroyed when the limiter kicked in.
My Blameless is working!
I’m so happy! Ever since I was a humble EE student, I’ve wanted to design my own hi-fi power amp based on Douglas Self’s “Blameless” philosophy. I now proudly present the prototype.
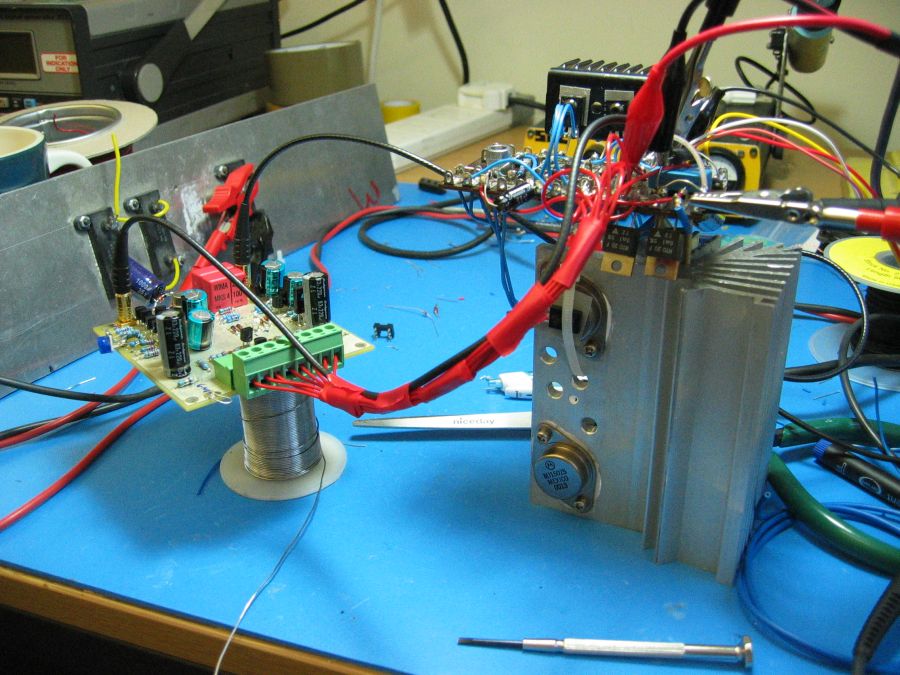
I’ve built power amps from other people’s designs before, but this is the first one I’ve designed, albeit with a lot of help from Self’s “Power Amplifier Design Handbook.” It’s a modular system, with a driver board that can be hooked up to any kind of output stage, to make different kinds of experimental amps.
It’s still not finished: the protection circuitry and THD need testing. But it’s passed the first hurdle, in that it can run with a good DC offset (I measured 16mV), stand +/-60V rails and drive a load without blowing up.
The last three amps that I’ve built were powered by valves (tubes?), and the two before that had MOSFET output stages, so working purely with BJTs was a bit of a culture shock. Self always argued that they were the best amplifying devices, and they certainly seem pretty good. The OnSemi MJ15024/MJ15025 pair of transistors I used in the prototype cost a few dollars each, less than half the price of equivalent MOSFETs, and they make as much Umph as a pair of KT88s. They didn’t want to oscillate or explode, and the whole thing generally just worked first time. Apart from that evening I slipped with the scope probe and took out half a dozen trannies in the driver board.
This is something of a multicultural project. The output trannies were made by Motorola in Mexico, all of the other ones came from Continental Device in India (that’s what you get when you buy Farnell’s “Multicomp” value brand transistors) and the whole mess was assembled by a Scotsman wired on Fairtrade coffee beans.
And yes, Self convinced me to buy a distortion analyzer. So far all it’s told me is that I need to get a better signal generator.
Resampling in Mac OS part 2 :)
After a few snarky messages from Mac owners, I thought I had better post a follow-up. I experimented a little at the weekend and found the following:
If I leave my soundcard (Audiophile Firewire) permanently on 96kHz, then:
iTunes will resample to 96kHz internally, with quality that sounds just fine.
VLC will output at whatever the sample rate of the media is, and get resampled to 96k by AUHAL on its default quality setting, which sounds a bit sketchy.
But, VLC can be set to always output at a particular rate, resampling internally. There’s an option called “Frequency” in the advanced audio preferences. According to VLC’s debug stream, it uses a module called “bandlimited_resampler”, and that’s encouraging, because it suggests that the guy who coded it knows the word “bandlimited”. It uses about 6% CPU time, and again, sounds fine. Thanks to the wonders of open source, we can see bandlimited.h here! Ooo, a 1536 point sinc kernel with linear interpolation and single-precision floating point arithmetic.
I got VLC’s “Media Library” to work too, so it can store a playlist, remembering what FLAC stuff I have and the track order of it.
I’ve not tried to play DVDs yet, but hopefully the computer won’t catch fire.
So in conclusion, I’m upgrading this from “:(” to “:)”
Resampling in Mac OS :(
Recently I’ve been experimenting with higher definition music downloads. For example, the Studio Masters recordings from Linn Records, or the material from B&W Society Of Sound. Everything went nicely until I got my new Mac.
First of all, the only lossless format supported by iTunes is Apple Lossless. It won’t play FLAC (the open source Free Lossless Audio Codec) properly, even with the xiph.org extensions, Fluke, or whatever. A bummer, as I already had a fair amount of music in FLAC format. Sure, VLC will play it, but VLC can’t understand iTunes playlists.
Second, Linn don’t support Apple Lossless. They supply their music in FLAC and WMA formats only. I guess they’d rather you bought their own stupid, overpriced DS network media players, even if you have a Mac already.
Third, Mac OS resamples! Windows was smart enough (or dumb enough?) to set your audio hardware to the actual sample rate and bit depth of the track that was currently playing. Or at least the setup I used, Winamp Classic with the ASIO driver, would do that, guaranteeing bit-accurate output under all conditions.
The Mac doesn’t. You set the sample rate and bit depth once and for all in the audio control panel, and all the sound gets resampled to that. You can play 96kHz material till you’re blue in the face, using any player application you like, but if the system sample rate is set to 44.1, it’ll get downsampled. Watch a DVD, and the sound is getting resampled from 48 to 44.1.
I don’t know about you, but I wouldn’t trust any resampling algorithm I hadn’t written or at least tested myself. They’re notoriously hard to get right. And a “right” one consumes so much CPU power that there’s a real incentive to downgrade the performance deliberately.
Here’s the official line from the Coreaudio mailing list, found here
This was a comment posed to the list (which was replayed verbatim from Benchmark’s Elias Gwinn)
> […] If the user changes CoreAudio’s sample-rate in AudioMIDI Setup to something different than what iTunes is locked to, CoreAudio will convert the sample rate of the audio that it is receiving from iTunes. In this case, the audio may be undergoing two levels of sample-rate conversion (once by iTunes and once by CoreAudio). (The SRC in iTunes is of very high quality (virtually inaudible), but the SRC in CoreAudio is horrible and will cause significant distortion.) If the user wants to change the sample rate of CoreAudio, iTunes should be restarted so that it can lock to the correct sample rate.
This is the response from an Apple employee:
iTunes uses the AudioConverter API internally but we set the quality to “max” and AUHAL probably uses the default (I don’t know). One SRC at max quality followed by one at the default quality is not so great when analyzing sine tone playback.
So the bottom line seems to be, that if you have material recorded at a higher sample rate than 44.1, then you need to turn your system’s sample rate up to appreciate it. And if you do that, then all of your other stuff will get upsampled, though at least it uses Coreaudio’s best quality algorithm. Or does it? Leopard introduced a new “Mastering grade” algorithm, and it’s not obvious whether that one is used.
One step forward, two back. Come on Apple, twiddle those nose rings and come up with a sexy solution.
To EQ or not to EQ, that is the Q
If you’re a follower of hi-fi trends, you might have noticed that tone controls don’t seem to be cool any more. High-end amplifiers have become very minimal, with only a volume control and power switch.
Well, there’s high end and high end. Richard Burwen’s system would certainly qualify as high-end by almost any definition, if only because of its 20,000 watts of amplification, 169 speakers, and 34 channels of active crossover and EQ, which Burwen claims to have spent a year adjusting by ear for a flat overall frequency response. In other words, the very opposite of a minimal system.
Moving on to my own hi-fi system, which has 60 watts of amplification, 2 speakers, and no tone controls or EQ whatsoever, and has been plagued by annoying room modes. I’ve tried several different speakers, but the bass on all of them just sounded terrible in there.
Recently, I realised that the fundamental problem is that my living room has the two large opposing walls made of solid brick. These two reflective surfaces allow a standing wave to develop between them, and the result is a highly resonant bass boost of about 9dB at 60Hz. I fed the measurements of the room into an online room mode calculator, and it agrees that I should get terrible bass.
So, what to do about it? The minimal solution would be to damp the resonance by installing bass traps. This would be a major carpentry project, though, and good bass traps have to be physically large, so I would lose space in the room. And, I hate working with rockwool, it makes me itch all over.
So, like Richard Burwen, I decided to install an EQ, and “tune by ear for flat frequency response”. My first attempt was with an Alesis PEQ-450, which is a 10-band digital parametric EQ. It only took about 5 minutes to find the offending frequency and notch it out, and I was amazed by the improvement. I found myself getting out those old hip-hop and drum’n’bass CDs that had just sounded offensive on the system before.
However, I wasn’t too happy with the sound quality of the PEQ-450. Maybe I was imagining it, but I felt that it grunged up the treble somewhat. It was also too big and I had nowhere to install it. I ended up buying two (they’re mono) Presonus EQ3Bs on Ebay, and again, tuned them by ear for best bass. I could have gone digital with a Behringer DEQ2496, but in the end, I decided that the simpler solution would be better.
So now, I find myself in the situation of committing audio sacrilege (tone controls are bad! So EQ must be worse!) in order to get a major improvement in the performance of my audio system. Mmm, sacred cowburger.
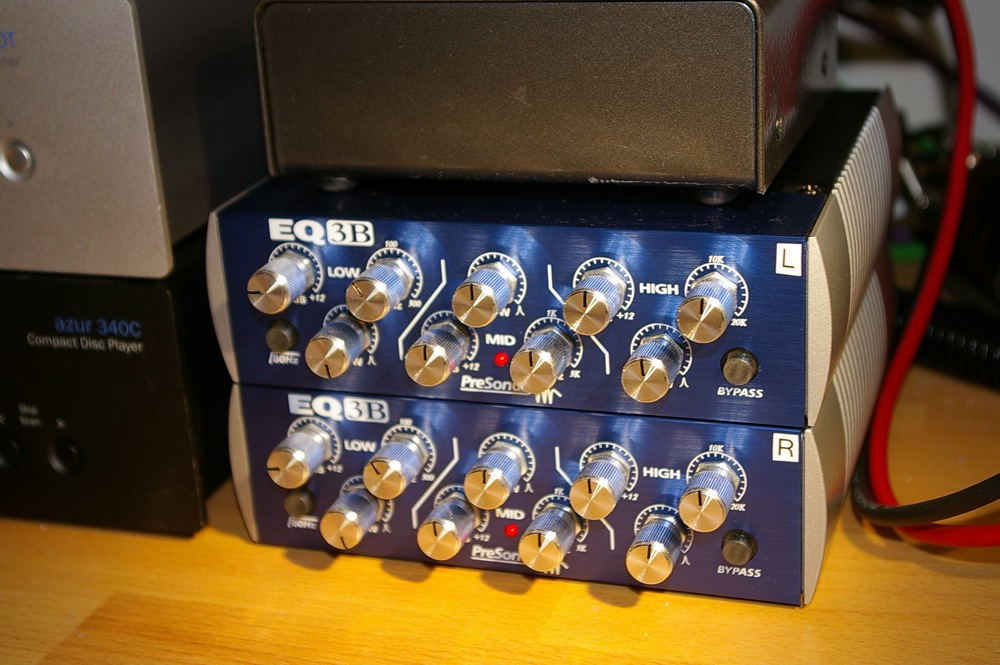
The EQ3Bs in place
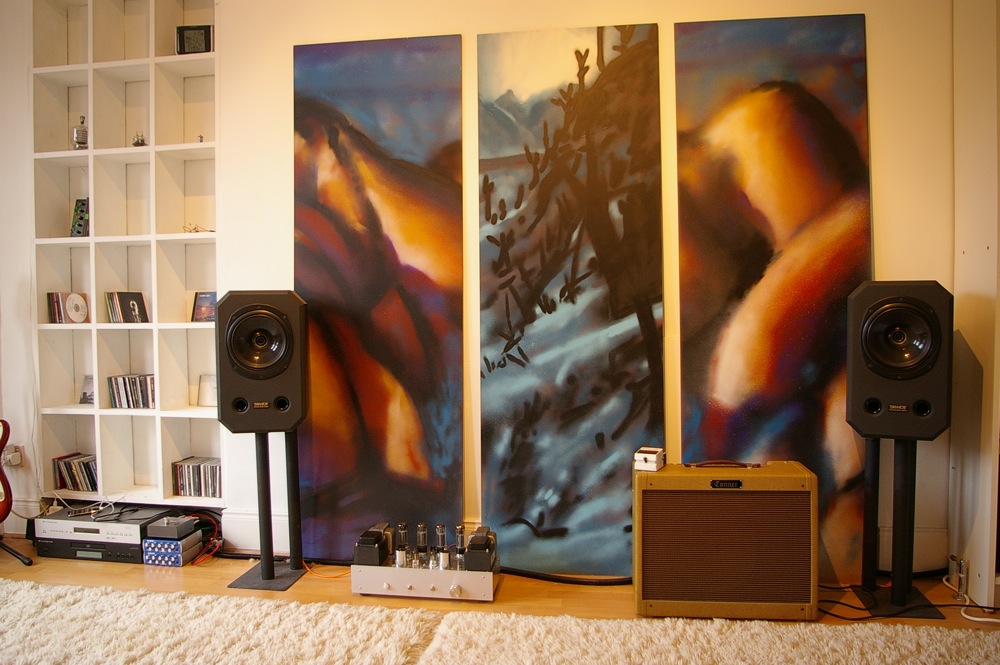
The system. The graffiti paintings are by my brother, and help to break up standing waves too. 🙂
Anachronisms
“The representation of someone as existing or something as happening in other than chronological, proper, or historical order.”
For instance, TV antennas on the roofs of houses in a Jane Austen period drama. Jet vapour trails in the skies of a Western movie. General Patton packing a Blackberry.
Or a steam locomotive with a web address painted on the tender.
The Tornado project is well worth reading about, though.
Goodbye decks…
Lack of DJ skillz and impending middle age forces sale! ;-(
There’s a story behind me and decks, which I can tell now that the 10 year non-disclosure agreement has expired. In my final year at university, I took the “Innovation For Engineers” class, which taught how to be an entrepreneur. Myself and another student, Andy Williams, decided that we would have a go at entrepreneurship for real. Andy knew I was a mad inventor, and he lent me money to develop one of my inventions, in exchange for half of the profits. (lesson 1 in entrepreneurship: never give anyone half of the profits)
The invention I chose was an improved crossfader for DJ mixers. I’d just fixed a DJ mixer for a friend, his crossfader had worn out, and I thought I could invent one that would last for ever. I soon had a prototype together, and we took it to music industry trade shows in Manchester and London to attract interest. The first interest we got was “Company G” who offered us £10k to bury the thing, a la everlasting lightbulb. (In hindsight we should have taken that.)
After a lot of board treading, we got the attention of “Company N” who agreed to buy the invention off us and fund the patent. Enter endless messing around with contract and patent lawyers. All went well until a substantive patent search found that I had reinvented a mechanism first patented by RCA in the 1970s. Game over! We walked away with £5k each, after a year’s work, for a net hourly rate comparable to flipping burgers. But it was certainly an interesting experience.
Company N launched the new fader anyway, in their Pro SM-3 mixer. Sales were so-so and the model was discontinued after a while, the company choosing to get out of analog mixers altogether and go to a digital solution.
Fast forward to 2 years ago, when I finally decided to buy some decks of my own. I bought a second-hand pair of Technics 1200s, only to discover to my surprise that I’m a crap DJ! I can match beats, but I can’t be bothered shopping for records, and have no idea what sort of records I’d want to buy anyway. And if I ever do buy any, I can’t remember the right places to mix them into each other.
The decks had their finest hour at my 30th birthday party, where I persuaded a friend of a friend to come and spin drum’n’bass on them. My flat was well and truly rinsin’! Unfortunately the rest of us got completely drunk, kicked him off the decks and started to play Blondie. He didn’t drink, and left in the huff. The party was still going at dawn the next day. Sorry, Chris.
Now I think it’s time to move on. Feel free to bid on my decks on Ebay! 🙂
